A Complete Guide to Culling Photos Quickly & Efficiently
Last updated on 05/06/2024
Contents
Culling photos is an important skill for any photographer, whether amateur or professional, and an essential step in the photo editing process, but it can be difficult to know how to go about it.
According to surveys culling may only take an average of 2 hours to complete, compared to the average 14 hours spent to edit a full-day wedding, but it is still usually a pretty time-consuming, and somewhat daunting task.
At the same time, it is important to get it right, as culling sets the tone for the whole post-production process and will most certainly influence the project’s final result.
Efficient and tasteful photo culling is essential for putting together a strong portfolio and for delivering the best work possible to our clients. The culling process can be a difficult and time-consuming task that may seem daunting, but it doesn’t have to be!
This A-Z photo culling guide will bring you up to speed with everything you need to know about culling in photography in 2024, touch on the new and trending solutions for culling photos with AI, the best culling software available, and walk you through the steps on how to cull your photos so that you can get the best results with minimal time and effort.
Starting from basics like the definition of culling, what culling means in photography, what is the main goal of culling photos, and what is the best way to cull photos easier and faster.
We will also learn the culling secrets from one of Imagen’s talent photographers who specializes in multi-day photoshoots, what are the benefits of culling photos the very same day they were taken, and how AI photo culling and AI batch editing in a single seamless workflow might be your answer to the fastest and easiest photography post-production you’ve ever experienced.
So let’s dive right in.
What is Photo Culling?
 First things first, before diving into the best photo culling practices and the most efficient ways to cull photos quickly, let’s cover the basics and answer the main questions: What is culling in photography, and why is culling necessary?
To define culling in photography, let’s start by answering the main question: “What does culling mean in general?” According to Merriam-Webster, to cull something means simply to select from a group or to choose.
So culling in photography is the process of reviewing all of the photographs you have made and selecting the best ones to edit, removing the duplicates, the blurry photos, the overexposed, or simply those in which our subjects don’t look their best.
This can be a tedious task, especially if you have a lot of photographs. For example, the average wedding photographer finishes their day late, exhausted, and with around 3,000 photos waiting to be processed. The more photos you have to process, the longer the editing will take, so filtering all the bad ones and duplicates right away may save you lots of time on editing. Because of that, it is important to be selective with your photographs, as this will help you improve your photography skills.
Why Is Culling Necessary For Photography?
As a photographer, you should constantly be striving to better your craft. Professional photographers delivering work to clients should also consider a story that the selection of the final photographs should be telling through the gallery Especially if it captures such an enormous milestone in the lives of their clients, like a wedding.
Culling your photographs is an important part of this process, and while it can be difficult to know where to start, it can help to remove photos that aren’t quite up to your personal standards, or vision.
Through the culling process, you can bring that 3,000 photo count down to 800, meaning only about 25% of all shots usually get to the final gallery presented to the customer. When you cull, you’ll be removing grainy or blurry photos, out-of-focus shots, and those that feature subjects that are unintentionally closing their eyes. As well as filtering out photos that aren’t properly exposed, and too similar shots that might be considered duplicates.
The objective behind culling is to help you choose the most flattering photos from your session and those that contribute to telling the story in the best way. Now that we agree on why culling is important, let’s dive into the best way to cull photos, and some pro tips for culling photos quicker.
How to Cull Photos Quickly & Efficiently: Step-by-step
There are so many methods for culling – whether manual or automatic. What is most important is that the method you pick works best in your workflow.
Here are some things to keep in mind when culling your photographs:
- Evaluate the composition of each photo. Is the subject in the ideal position? Are there any distracting elements in the frame?
- Look at the technical aspects of each photo. Is the exposure correct? Is the focus sharp?
- Consider the emotional impact of each photo. Does it capture how the story and emotions that happened during the event or photo session?
- Don’t rush through the process of culling your photographs. Review each photograph carefully and take your time to decide which ones you want to keep.
- Be critical and honest with yourself when you are reviewing your photographs. If a photograph isn’t up to your standards, then don’t keep it.
A well-edited product is the key to a successful photography business.
There are mainly two types of photo culling: Cull in and Cull out. Both of these are the beginning phases of the culling process, but important to understand how they work so you know what works best for your workflow.

Cull In
The idea behind Culling In is to add color, flags, or star ratings for any photos that you want to keep.
Cull Out
The idea behind Culling Out is to add color, flags, or star ratings for any photos that you want to be deleted or ignored. The simplest method for this is to use the reject flag.
Phase two in the culling process is about telling your story. Here you use your preferred attribution method to define which images are sneak peeks, to be edited, to be delivered, and so on.
My Photo Culling Process
My personal manual culling process is as follows.
- I Cull Out by adding rejects to any photos I do not want to look at a second time. But I do not delete them. I simply ignore them.
- Then I use star attributes to determine photos to be shared with clients in a digital gallery, photos “to definitely edit”, and then finally any client picks. Because I’m a weirdo, my attributes are odd numbers.
– 1 star for digital gallery
– 3 stars for “definitely edit”
– 5 stars for client picks - Once the client has their proofing gallery, they send in their favorites, I will 5-star those knowing they are more likely to be ordered as a print. So those always get the most attention.
- Once the culling is complete, I move on to editing.
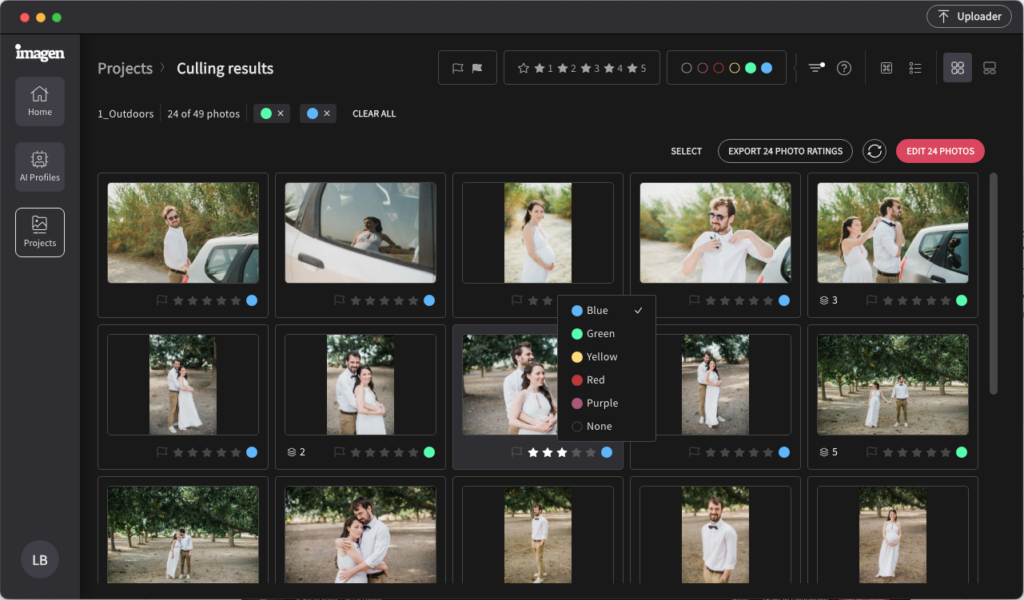
Reviewing photos in Imagen Culling Studio with AI edits applied and sending them for editing
Charmi Patel Peña Photo Culling Method
Charmi is an amazing wedding photographer who specializes in unique three or four-day-long weddings. As you can imagine, she finishes her weddings with well over 10,000 photos to cull through.
When I spoke with Charmi for our podcast, Workflows, she shared two really interesting tips and tricks about her culling process.
Charmi shares that she prefers to cull photos she took the same day. Not only that but when she does multi-day weddings, she tends to also break down the culling process and cull photos in batches, meaning at the end of each day she would already cull photos made that day, before shooting the next part.
Why?
Because she has the story of the day fresh in her mind. Charmi culls manually and does not use automated photo culling software. She has her system down and can get through each day’s photos fairly fast.
The other really interesting thing that Charmi does with her culling process, is culling photos in reverse.
What this means is that she reviews her various sets of photos from the end to the beginning. By knowing she will have a first look set, she can be ready for the right expressions. But she also knows that she will be done with the set when she gets the expression she wants. Culling in reverse offers her a faster way to cull because she mostly looks first at what would be the pick from each set.
Interesting, right?
You can learn more from Charmi about this in the snippet from her episode of Workflow below, or by listening to the full episode here.
Ok, so far we’ve covered all the basics about what is the definition of culling in photography, why culling is necessary and important, and even discussed the most popular culling methods and the culling tips and tricks that different photographers use.
But all that was true 10 years ago as well. Advancements in technology have been constantly shifting the photography industry in recent years, and the latest AI software boom is no different, bringing yet another tectonic change to photography as we know it.
Although trusting software with such a passion-driven and creative craft such as photography might seem intimidating, let’s see how we can use it to our benefit by embracing the power of AI technology and utilizing the best photo culling software. Our main goal in Imagen is to let photographers enjoy faster workflows and more time behind the lens, not behind the screen, without compromising the unique artistic touch and feel.
Culling Photos with AI
In today’s photography landscape, AI technology has become an essential ally for staying competitive and efficient. Contrary to concerns, the best AI culling software enhances the creative process by automating tedious post-processing tasks, allowing photographers to streamline and simplify their photo culling and editing workflows and focus on their artistic vision in the time it will save.
Imagen stands out as an all-in-one solution for AI culling, batch photo editing in your personal style, and Cloud Storage for safe and efficient backup. It streamlines the process, eliminating the need for multiple tools, and ensures photographers maintain their individuality while benefiting from time-saving AI technology. Imagen is focused on developing game-changing technology aiding the professional photographer, and we are bringing our AI to culling with our brand new release of the Imagen Culling Studio.
Key Perks of AI Culling & Editing with Imagen Culling Studio
With Imagen Culling Studio, you can customize your culling preferences by rating with stars, colors, or flags, and choose their preferred grouping criteria based on the level of similarity. This personalized adaptive technology will enable you to maintain full control over your workflow and speed up the manual selection, so you spend more time on what you love, and less on tedious work.
- Imagen’s AI culling accelerates image sorting, saving valuable time on every shoot
- Imagen adapts to individual styles, ensuring a personalized and consistent output
- Imagen seamlessly integrates AI into the entire post-production workflow, offering robust batch editing capabilities
- While automating tasks, Imagen preserves the photographer’s unique signature style
- After the culling review process is finished, the user can export the results to Lightroom (or another Adobe Creative Cloud tool), or continue directly to edits.
- Keyboard shortcuts are exactly the same as in Lightroom Classic, so it’s familiar and intuitive to use for anyone who is used to Lightroom
And the coolest part: The latest update of the Culling Studio brings an exciting addition that lets you seamlessly preview an entire catalog with your favorite AI Profile already applied (as if the photos were already edited), and then simply send the selected photos to apply the edits, without leaving the app.

Imagen what you can focus on when we are handling your culling and editing in one seamless workflow. Elevate your craft with Imagen’s AI culling software, where efficiency meets artistry, allowing you to focus on creativity without compromising time. Free photo culling is available for all Imagen subscribers without any additional charge.
Not a subscriber yet? Subscribe to Imagen today to get full access to both culling and editing for a single seamless post-production workflow or start your free trial and get your first 1000 AI edits for free!
Sign Up Now & Start Saving Time On Culling & Editing
Utilizing The Best Photo Culling Software
As I mentioned earlier, culling your photographs is an important step in the editing process, and there are a few different ways to go about it. Sure, you can still do it manually, but if you really want to elevate your culling game — the quickest way is to use software dedicated to the automated culling process and save your time and creative energy for something you actually love doing.
Here are just some of the benefits of culling with the help of modern culling software:
- Diverse Options: The market offers standalone photo culling apps and comprehensive culling systems within larger editing suites.
- Efficiency Boost: Dedicated photo culling apps streamline the process, allowing quick sorting and identification of the best images.
- Personalized Experience: The best photo culling software adapts to individual preferences, offering a personalized culling experience.
- Seamless Integration: Comprehensive culling systems embedded in editing suites ensure a smooth transition from culling to editing.
- Culling Optimization: Leveraging advanced algorithms, these systems learn and adapt to the photographer’s unique style over time.
- Budget-Friendly Choices: Photography culling software comes in both free and premium versions, catering to various budget constraints.
Investing in the best culling software, whether standalone or integrated, can transform and optimize your photography workflow. Beyond efficiency, it’s about finding a tool that intuitively aligns with your creative process, allowing you to focus on capturing and perfecting the moments that matter most
How to Cull Photos in Lightroom
Some photographers still prefer to do the culling manually and are looking for a more optimal way to do it in Lightroom, so this guide would not be truly complete without this.
Culling photos in Lightroom is an essential process for photographers aiming for an organized and efficient post-production workflow. Lightroom’s features, including AI culling capabilities, let you simplify and personalize this step, in comparison to doing it all manually on your computer.
Some efficient steps to cull in Lightroom are:
1. Import Images
Start by importing your images into Lightroom to initiate the culling process.
3. Personalized Review
Manually refine AI-selected images to ensure alignment with your unique editing style and vision.
4. Flag and Rate
Utilize Lightroom’s flagging and rating system to mark images for further editing or potential exclusion.
5. Create Collections
Organize selected images into collections for efficient management and accessibility during editing.
Culling in Lightroom allows you to save time compared to doing it completely manually, and also ensures that the selected images align with your creative vision. That said, today there is a wide choice of leaner, and simpler culling and editing software to speed up and simplify the culling process even more.
Unlike the most up-to-date AI photography culling software, such as Imagen, Lightroom is still much slower and lacks automated detection, and robust grouping features.
Recap On Photo Culling Simplified
In this photo culling complete guide, we’ve learned that efficient photo culling is all about selecting the most compelling, flattering, and memorable shots from your gallery, and utilizing the best tools and technologies, to help you do it faster, and easier.
We discovered easy steps for quick and efficient culling, with Lightroom and AI culling software like Imagen making the culling process even easier and faster. Choosing the right culling software software is key to finding that sweet spot between efficiency and your personal workflow preferences. Whether you’re a pro or just starting out, these insights aim to make your photography business more successful, and your day-to-day more fun, and creatively rewarding. Strike a balance between hands-on photo picking and tech magic, and let your photos tell your awesome story.
Imagen the possibilities!