

9 Photo Culling Tips for Portrait Photographers
Table of contents
- 1. Cull in comparison groups, never one frame at a time
- 2. Reject first, rate later
- 3. Judge the eyes and the expression before anything else
- 4. Shoot with culling in mind so the sort starts clean
- 5. Master your flagging shortcuts until your hands never leave the keys
- 6. Set target counts per setup or per person before you start
- 7. Let AI culling absorb the mechanical first pass
- 8. Keep culling and editing in one cloud workflow
- 9. Route the fixes AI culling does not handle to dedicated tools
- Putting the tips into a repeatable sequence
- Frequently asked questions
Portrait work looks calmer than sports or events, but the cull is quietly just as demanding. A single environmental portrait session, lifestyle shoot, or family sitting can leave you with several hundred to a few thousand raw files, most of them near duplicates of the same pose with tiny differences in expression. The frame that matters is the one where the eyes are alive, the smile lands naturally, and nobody in the group is blinking. Good culling is the skill that finds that frame fast, and the gap between a photographer who delivers in two days and one who loses a week usually comes down to how they cull rather than how they shoot.
The nine tips below are built around the reality of portrait work: subtle expression differences, careful client galleries, and the need to protect connection while moving quickly. They cover how to set up before you cull, how to judge expression without second guessing yourself, and where AI culling removes the slowest, most mechanical part of the job so your attention goes to the frames that actually flatter your subject. Work through them in order and you will turn a cull that used to drag across several sittings into a fast, repeatable pass you can finish the same week.
1. Cull in comparison groups, never one frame at a time
The biggest speed gain in a portrait cull comes from how you view frames. Reviewing images one at a time forces your memory to do the comparing: you look at frame six, then frame seven, and try to recall which smile felt more genuine. That memory work is slow and unreliable, and expression differences are far too small to hold in your head. Portrait sessions cluster naturally into groups of nearly identical poses, so pull four to nine of them up at once in a survey or compare view and the strongest expression jumps out immediately. The relaxed jaw, the eyes that catch the light, the family frame where everyone is looking the same direction: you see it at a glance when the candidates sit side by side, and you cut the rest of the pose in one motion.
2. Reject first, rate later
Do not try to grade keepers and hunt rejects in the same pass. Splitting your attention doubles the time and wears you out before you reach the strong material. Run a first pass at speed where you mark only the clear failures: closed eyes, soft focus, an awkward mid blink expression, a stray hand crossing a face, a group frame where one person turned away. Trust your gut and keep moving. On a typical portrait take this first pass often removes 30 to 50 percent of the frames, and every image you cut here is one you never have to compare or grade later. Only once the obvious rejects are gone do you start choosing the best of what remains.
3. Judge the eyes and the expression before anything else
Portrait storytelling lives in the face. A frame can be perfectly exposed and sharp and still fail because the eyes are half closed or the smile has gone tight and posed. Train yourself to check expression first: are the eyes open, engaged, and catching light, and does the mouth read as natural rather than held? Only after a frame passes that test do you look at focus, framing, and light. This order matters because it is easy to fall in love with a beautifully lit frame and overlook that the subject looks slightly absent. In a family or group portrait, the same rule scales up: the keeper is the frame where the most faces are working at once, and that is rarely the most technically flawless one.
4. Shoot with culling in mind so the sort starts clean
Fast culling begins at the camera and on import, before you look at a single image. In the session, work in short deliberate bursts around a genuine moment rather than holding the shutter through dead time, and you will have far fewer empty frames to wade through later. On import, copy to two drives in the same step so a backup always exists, let your catalog build full previews during ingest rather than while you are clicking, and apply a neutral baseline profile so every frame looks close to final. Waiting on a preview to render is the most common thing that slows a cull to a crawl, and a clean, predictable import removes it before it starts.
5. Master your flagging shortcuts until your hands never leave the keys
A cull is a rhythm, and anything that breaks the rhythm costs you. Learn the keyboard shortcuts for reject, pick, and advance in whatever tool you use, and drill them until flagging is automatic. When your hands stay on the keys and your eyes stay on the images, you can move through a pose group in seconds. Reaching for the mouse to click a flag, or stopping to think about which key does what, turns a two minute review into a five minute one. Multiply that across a couple thousand frames and the shortcuts alone save you the better part of an hour.
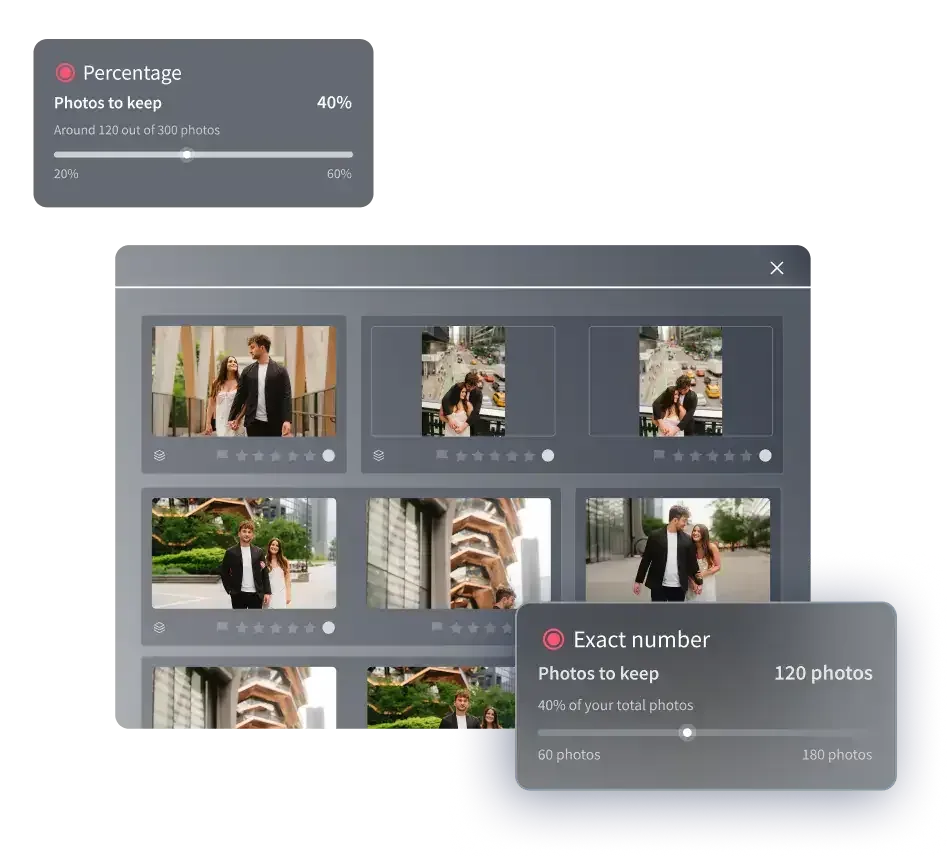
6. Set target counts per setup or per person before you start
Open ended culling invites second guessing, and portraits are especially prone to it because so many frames are technically fine. Decide up front how many keepers you actually need: a set number per pose, per outfit, per location, or per family member, based on what the client asked for. When you know you are choosing three frames from a setup rather than an unlimited number, the decision gets faster and the gallery stays tight. Target counts also stop the common trap of keeping every acceptable frame, which leaves you editing hundreds of redundant near duplicates and delivering a bloated gallery that buries your best work and overwhelms the client.
7. Let AI culling absorb the mechanical first pass
Even with a disciplined method, the first pass still means a human clicking through hundreds or thousands of frames to find blinks, soft focus, and the strongest frame in each pose group. That mechanical sorting is exactly what AI culling is built to absorb. AI culling software analyzes the full take, flags the technical failures, groups near duplicate frames, and surfaces the strongest candidate in each cluster, so your first pass becomes a quick review of the machine’s suggestions instead of a from scratch hunt through the whole session. On a busy portrait week with several sittings back to back, that turns the longest, most tedious part of the job into the fastest.
Imagen is a desktop app with cloud AI processing, built for exactly this kind of high volume, expression driven work. Its portrait photo culling software reviews the full take, groups the near duplicates, and flags closed eyes and soft focus so you confirm rather than sift frame by frame. Because the heavy analysis happens on Imagen’s servers rather than on your own laptop, you are not stuck waiting while it works. For a portrait photographer juggling family sittings, lifestyle sessions, and environmental portraits in the same week, that is the difference between delivering on time and falling behind.
8. Keep culling and editing in one cloud workflow
Every export and re import between separate apps is lost time, and across a full slate of sessions that lost time adds up fast. The faster path is to cull and edit in the same place. Once your keepers are chosen, Imagen learns your personal editing style from your past work and applies consistent color and skin tone across the whole set in one batch, so the frames you kept come back already looking like yours. Consistent skin tone matters more in portraits than almost any other genre, because a client notices instantly when one frame reads warmer than the next. Pay as you go pricing is a monthly base fee plus a charge for the photos you export, and because Imagen’s new Studio keeps culling, editing, review and export in one project, you move from raw import to a finished set without hopping between tools. To try it on your own catalog, start at the Imagen homepage.
9. Route the fixes AI culling does not handle to dedicated tools
AI culling is excellent at the sort and grade problem, but it is not a retouching engine, and knowing the boundary keeps your workflow clean. Culling decides which frames survive. It does not smooth skin on a hero portrait, erase a distracting sign behind an environmental subject, or merge exposures into a true HDR composite. Route those jobs correctly rather than expecting the cull to do them.
- Portrait retouching and skin work. Detailed skin retouching, blemish removal, and eye enhancement on your final selects belong in a dedicated retouching tool after the cull, not in the culling pass.
- Heavy object removal and compositing. Erasing a large distracting element behind the subject, or swapping a sky over an outdoor family portrait, belongs in a dedicated compositing tool, not the cull.
- Deblur and denoise rescue. If you choose to save a slightly soft frame shot in low light, run it through a dedicated deblur and denoise tool afterward rather than expecting the cull to recover it.
- True HDR bracket merging. If you bracketed a backlit environmental setup, exposure blending is a separate dedicated merge step before you cull the result as a single image.
Cull first to decide which frames are worth the extra effort, then send only the small number of true keepers to whatever specialized tool the fix requires.
Putting the tips into a repeatable sequence
Speed comes from repetition, and repetition comes from a fixed order you never deviate from. Write your culling steps down and follow the same sequence every session until it becomes muscle memory.
- Import with dual backup and let previews and baseline profiles build fully.
- Run AI culling to flag blinks, soft focus, and near duplicate pose groups.
- First pass: reject obvious failures at speed, no rating yet.
- Second pass: in compare view, pick the strongest expression from each pose against your target counts.
- Third pass: confirm selects at full size, check sharpness on the eyes.
- Send keepers to batch editing, and route any retouching to its dedicated tool.
Each step reduces the load on the next, so by the time you reach the close look of the third pass you are examining dozens of frames, not thousands. For the edit that follows the cull, see our guide on how to batch edit photos faster, and for organizing files before you start, see how to organize photos before editing.
What’s new in Imagen: Imagen is now an intelligent, agentic Studio for professional photographers, where you cull, edit, review and export in one project, in any order. For portrait work, the assistant finds photos and acts on them when you ask in plain language, with you steering, while AI filters such as closed eyes help you narrow a family session. The Studio is rolling out gradually, and Imagen has more to read.
Frequently asked questions
How long should culling a portrait session take?
With a disciplined reject first method and AI culling handling the mechanical sort, a typical portrait sitting of a few hundred frames should take well under half an hour, and a larger lifestyle or family session of a couple thousand frames should take under an hour. If your cull runs longer than that, the usual culprits are reviewing single frames instead of comparison groups, or grading keepers before rejecting the obvious failures. Getting those two habits right is where most of the time is won.
How do I choose between two portraits with almost identical expressions?
View them side by side rather than flipping between them, because the difference is usually too small to judge from memory. Check the eyes first: which frame has both eyes fully open, engaged, and catching light. Then look at the mouth for the more natural, less held expression, and finally at small things like a stray hair or a hand position. In a group portrait, the tiebreaker is simply which frame has the most faces working at once. When two frames are genuinely equal, keep the one that is sharper on the eyes and let the other go.
Should I cull in Lightroom or use dedicated culling software?
A desktop catalog tool works fine for a small sitting, but for a full portrait workload dedicated AI culling is meaningfully faster because it flags soft focus, closed eyes, and near duplicate frames automatically. Many portrait photographers cull in a dedicated cloud tool to keep the heavy sorting off their own machine, then bring only the keepers into their catalog for final adjustments and retouching.
Does AI culling make the creative decisions for me?
No, and it should not. AI culling handles the mechanical part: it flags technical failures and groups the near duplicates so you are not hunting for the best frame by hand. You still make the creative call on which expression feels most like your subject, which frame the family will connect with, and which portrait best fits the story you set out to tell. The software narrows hundreds or thousands of frames down to a manageable set of candidates, and you choose the finals from there.
