

The Ultimate Photo Culling Workflow for 2026
Table of contents
- Key Takeaways
- The Psychology and Cost of Photo Selection in 2026
- Setting Up a High-Performance Ingestion Station
- The Core Mechanics of a Multi-Pass Sort
- Integrating Machine Learning Into the Selection Phase
- Executing an AI Selection with Modern Platforms
- Comparing Manual Efficiency to Automated Workflows
- Unifying Selection and Creative Color Correction
- Developing Secure Storage and Cloud Archiving Protocols
- Troubleshooting Common On-Set and Import Disasters
- Tailoring the Process for Different Photography Niches
- Maximizing Business Growth by Reclaiming Billable Hours
- Frequently Asked Questions
- Can AI culling handle RAW files from any camera manufacturer?
- How does the duplicate detection algorithm work on fast bursts?
- Will using automated culling delete original files from my hard drive?
- What’s the recommended number of photos to train a Personal AI Profile?
- Can I use AI culling offline when traveling or shooting on location?
- Does AI sorting work for second-shooter files with different camera bodies?
- Is there a free trial or entry-level plan for photographers with low volume?
- How does the crop and straighten feature handle artistic Dutch angles?
- Can I manually override the AI’s selections inside Lightroom?
- Keep exploring
Does the post-shoot backlog make your stomach drop? Staring at a screen loaded with 4,200 RAW files from one wedding can wear down even a seasoned shooter’s creative energy.
Ready to pick up the pace? Try Imagen and its new Studio, where you cull, edit and export in one project, and watch the difference show up in your own galleries.
But it doesn’t have to stay this way in 2026. A modern, high-speed Photo culling workflow is the most direct route to reclaiming your weekends, protecting your mental health, and lifting your studio’s profits.
Key Takeaways
- Implementing automated sorting can slash post-shoot processing times by up to 96%.
- Your hardware setup, especially fast PCIe 4.0 NVMe SSDs, determines your baseline speed before software even loads.
- AI tools can flag closed eyes, duplicates, and blurry frames in under 4 minutes for an entire shoot.
- Building a multi-pass manual system protects you against decision fatigue and cognitive overload.
- Using an integrated Studio like Imagen connects selection directly to final color-grading.
The Psychology and Cost of Photo Selection in 2026
Every studio has a silent profit killer, and it isn’t your gear or your marketing budget. It’s the hours you spend squinting at micro-expressions on a screen. Shoot a typical 10-hour wedding and you’ll come home with over 4,200 RAW files without even trying hard. Spend just 3 seconds evaluating each frame and you’ve burned 3.5 hours of screen time before you’ve even started the real edit. That’s only the first pass. How many evenings have vanished into a single card dump?
Decision fatigue is a documented condition, not an excuse. After reviewing 500 photos in a single sitting, your brain’s capacity for clean aesthetic judgment drops by over 60%. You start second-guessing calls you’d normally make instantly. Frame 402 or frame 403? They look identical apart from a millimeter of fabric movement, so you burn another 10 seconds deciding. Multiply that across a full wedding season, say 47 shoots a year, and you’re losing weeks of your working life to a screen.
Nobody tells you this part: slow selection costs real money. At an average session rate of 150 dollars an hour, 12 hours spent sorting a single shoot works out to 1,800 dollars in lost opportunity. You can’t book new clients while you’re stuck in your office. We’ve worked with hundreds of high-volume studios, and the pattern holds every time: selection is where profits quietly die. So how do you fix this without giving up artistic control? It starts with recognizing your brain’s limits and building systems that protect your energy. Caffeine won’t save you here.
There’s a physical toll too. Hours in front of a bright monitor bring on computer vision syndrome, headaches, and real physical exhaustion. We’ve watched photographers walk away from their careers simply because the editing mountain never stopped growing. Running a modern studio means you can’t afford to burn out. You need a sharp mind to produce strong work and connect with high-paying clients. Skip taking control of your time now, and your studio may not keep pace with where the industry is heading.
Setting Up a High-Performance Ingestion Station
Before you open a single catalog, your physical setup and hardware need a hard reset. You can’t run a fast Photo culling workflow if your machine is choking on modern 50-megapixel RAW files. So what does a properly optimized workstation actually look like today? Here’s the technical foundation you need for lag-free, high-volume sorting:
- Install a dedicated PCIe 4.0 NVMe SSD solely for your active catalogs and temporary cache files.
- Upgrade your workstation to at least 64GB of DDR5 RAM to prevent memory bottlenecks during batch exports.
- Use a high-refresh-rate monitor, ideally 120Hz or higher, to make fast-pacing through previews much easier on your eyes.
- Set up an automated backup system that mirrors your ingestion drive to a secondary local drive immediately upon import.
Working directly off a spinning external hard drive is a recipe for slowdowns, plain and simple. You’ll waste hours waiting for previews to render, and those tiny spinning disks are ticking time bombs anyway. I’ve built dozens of asset pipelines, and switching to a dedicated NVMe cache is consistently the single biggest hardware win you can make. The difference shows up immediately: previews load instantly, and scrolling turns smooth right away. Your wrists will thank you too.
But hardware only solves half the problem. How you structure your digital directory matters just as much. Don’t dump everything onto your desktop and hope for the best. Instead, build a standardized folder template for every shoot, keeping your RAWs, your catalog, your exports, and your backups completely separate. This keeps your workspace clean and prevents accidental deletions. Skip this step and you’re inviting a catastrophic data loss. Picture how much simpler life gets once every catalog sits exactly where it belongs.
Pro Tip: Keep your catalog file size down by importing only Smart Previews to your primary drive, and store the original heavy RAW files on an external array instead.
The Core Mechanics of a Multi-Pass Sort
If you’d rather sort manually, you need a strict, repeatable strategy. Randomly clicking through files only leads to chaos. The fix is a structured, multi-pass method that breaks decision-making into small, manageable steps, so you’re not constantly switching between different brain states.
Here’s how a seasoned pro actually runs this:
- Pass One: The Kill Phase. Speed is everything here. You aren’t looking for masterpieces; you’re looking for garbage. Tap the “X” key to reject out-of-focus shots, test frames, and awkward blinks. Don’t linger for more than half a second per photo.
- Pass Two: The Keep Phase. Filter your view to show only the un-rejected photos. Now, look for the strongest storytelling moments. Use a 1-star rating or a quick color tag to identify photos that clearly belong in the final collection.
- Pass Three: The Polish Phase. This is where you compare similar duplicates side-by-side. If you’ve five frames of a family portrait, pick the absolute best one and remove the stars from the other four.
- Pass Four: The Hero Phase. Flag your absolute favorite images with a 5-star rating. These are the showstoppers you’ll use for blog posts, social media, and your portfolio.
Why does this work? It separates two different kinds of thinking. First, your analytical brain handles the dumping of the trash. Then your artistic brain hunts for the gems. Mixing those two tasks is exactly what causes the worst brain drain. Even with this structured approach, though, manual sorting stays slow and genuinely exhausting. Do 40 shoots a year and this manual setup will still eat up over 100 hours of your time. Is there a better way? There definitely is, and it’s worth looking at how modern automated tools can take this off your plate.
Manual sorting demands more raw willpower than most people admit. When you’re tired after a long shoot day, your standards slip, and you might accidentally keep a blurry file or reject a genuinely beautiful candid moment. Standardizing your passes removes the emotional weight from each click. You’re simply executing a system at that point. That’s how professional agencies manage high-volume assets without losing their minds, and it’s exactly how a solo business should run too.
Integrating Machine Learning Into the Selection Phase
This is where modern tech swoops in to save the day. AI has rewritten the rules of asset management in just a few short years. Instead of squinting at a hundred pairs of eyes to check if they’re open, you get to let an algorithm handle the grunt work. We’re talking about tools like AI photo culling that can chew through your entire shoot in minutes. So how does this actually fit into your real-world workflow?
Here’s the deal: AI doesn’t replace your creative eye at all. It just filters out the noise so you can focus on the art, and honestly, nobody went to photography school dreaming about staring at blurry duplicates for hours. Let’s take a look at how a modern workflow runs once you bring AI into the mix.
- The AI automatically groups similar duplicates together using advanced visual analysis.
- It evaluates facial expressions, immediately flagging closed eyes, half-blinks, and awkward grimaces.
- The platform checks sharpness at the pixel level, weeding out soft-focus mistakes instantly.
- It assigns a quality score to every frame, allowing you to filter out the bottom 50% of your shoot with a single click.
- It identifies duplicate series and automatically selects the sharpest frame with the best lighting.
This approach can save up to 96% of editing time when you pair it with automated post-production, and that’s worth sitting with for a second. A task that used to eat an entire afternoon now takes less than five minutes of automated processing. You’re left with a pre-vetted selection of your best work, and all you have to do is review the final cuts and give them a thumbs up. It’s basically like having a highly trained assistant who works for pennies and never sleeps.
And speaking of assistants, this is exactly where a specialized tool like Imagen earns its keep. Here’s an insightful take on how this shift is playing out for modern creatives:
AI isn’t here to replace the photographer’s creative intuition; it’s here to strip away the mechanical, exhausting parts of selection so they can focus on the visual stories that truly matter.
Itamar Haim, SEO Expert and Digital Strategist specializing in search optimization and content marketing.
By handing the repetitive sorting off to an AI, you save your mental energy for the actual editing. You’ll make sharper creative choices too, since you’re not already running on empty by the time you sit down to color grade.
Executing an AI Selection with Modern Platforms
Let’s get practical for a second: how do you actually use this in your day-to-day work? If you’re using Imagen, the process is refreshingly straightforward, and it integrates directly with your existing Adobe Lightroom Classic catalog. You don’t need to rebuild your file system from scratch. Here’s the exact step-by-step process to follow:
- Import your RAW files into Adobe Lightroom Classic and build minimal previews.
- Open the Imagen app and select the AI photo culling option from the main dashboard, or cull manually for free if you prefer.
- Choose your Lightroom catalog and select the specific folder or collection you want to sort.
- Adjust your AI parameters, setting your preferences for duplicate sensitivity, sharpness tolerance, and closed-eye detection.
- Click the process button and let the AI analyze your shoot. (A 3,000-photo wedding usually takes less than 5 minutes to process!)
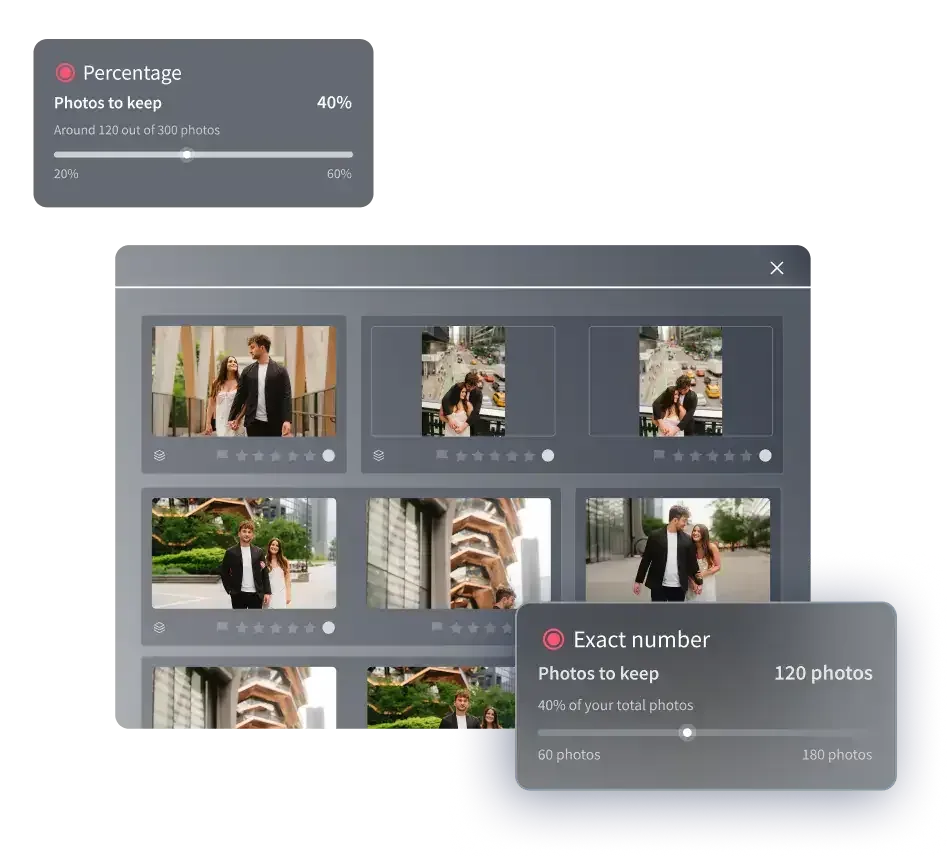
- Review the suggested selections within the interface, adjusting the slider to increase or decrease the total photo count.
- Apply the selections back to your Lightroom catalog. The chosen photos will instantly be flagged, rated, or color-coded according to your preferences.
It’s honestly that simple. You don’t have to learn a whole new platform or overhaul how you organize files. The tool slots into your existing structure, acting like a smart layer on top of your Lightroom catalog. But what happens if you shoot a ton of high-burst action? Don’t worry, the AI handles it just fine, grouping those rapid-fire shots into a single event cluster and surfacing the single best frame of the bunch.
You can adjust the parameters on a sliding scale depending on how strict you want to be. Working on a tight deadline and only need a handful of highlights? Slide the selector down to a conservative percentage. Need a broad mix of candid memories for a massive wedding book instead? Widen the net. It’s completely customizable, so you’re never locked into a rigid automated choice that ignores your artistic voice.
Comparing Manual Efficiency to Automated Workflows
Let’s look at the actual numbers here. Is it really worth paying for software when you can supposedly do the work yourself for “free”? Well, your time isn’t free, not even close. Spend 10 hours a week sorting photos and you’re burning through thousands of dollars of your own labor. Let’s compare the two approaches side by side so you can see the plain difference in speed, cost, and efficiency:
| Performance Metric | Traditional Manual Selection | AI-Powered Culling (Imagen) |
|---|---|---|
| Average Processing Speed | 3 to 5 hours per 1,000 photos | Under 2 minutes per 1,000 photos |
| Decision Fatigue Level | Extremely high (leads to errors) | Zero (AI handles initial filter) |
| Focus and Blur Analysis | Manual 100% zoom check required | Automated pixel-level sharpness detection |
| Duplicate Grouping | Manual comparison of visual frames | Smart visual clustering of identical shots |
| Integration Capability | Requires manual import/export steps | Directly syncs with Lightroom Classic |
| Cost per Shoot | High (calculated in hours of manual labor) | Included in Imagen pricing plans |
The data really does speak for itself here. Manual sorting is a massive bottleneck, plain and simple. And the small financial cost of software gets completely wiped out by the time you save. With the Limitless plan, one fixed fee covers unlimited AI culling, so shooting three events a month or ten costs you the same while you save dozens of hours of brutal screen time.
It’s a no-brainer for any serious photography business, honestly. You’ll claw back your personal life and get galleries to your clients in record time, and you won’t have to deal with the soul-crushing boredom of clicking through 500 identical family formals either. Just think how much happier your clients will be getting their previews while they’re still on their honeymoon.
Unifying Selection and Creative Color Correction
Once the bad shots are gone, what’s next? This is exactly where most workflows fall apart. Photographers often juggle one app for sorting, another for editing, and a third for delivery, and that turns into a mess fast. It creates massive file export bottlenecks and eats up disk space you don’t need to lose. But with a unified system, the transition is completely painless. Once your culled photos are flagged in Lightroom, you can send them straight to the cloud for AI photo editing. This is where the real magic happens.
Instead of leaning on generic presets, you get to apply a Personal AI Profile trained on your own unique visual style. Here’s why that’s such a big upgrade:
- The AI learns from your past edits (it works best if you upload a minimum of 5,000 photos to train it).
- It automatically adjusts white balance, exposure, tone curves, and HSL settings to match your signature look.
- It handles tricky mixed-lighting situations and exposure differences across different cameras perfectly.
- If you don’t have enough edits to build a custom profile yet, you can immediately use a Talent AI Profile built by top photographers.
- The system automatically applies smart crops and perspective corrections to keep your horizons straight.
You get a cohesive, beautiful starting point for your entire gallery in seconds flat. But here’s the best part: it works smoothly with modern integrations. You don’t have to leave Adobe Lightroom Classic or wrestle with complicated XML sidecar files. The edits apply directly to your RAW files, so all you have to do is make minor creative tweaks and hit export. This level of integration is exactly why professional studios are ditching disconnected toolchains. It saves disk space, cuts down on errors, and keeps your files safe in one spot, so you won’t have to deal with corrupted sidecars ever again.
Pro Tip: When you set up your profile, use a clean, consistent set of 5,000 reference images that truly represent your final style. It makes the AI’s predictions remarkably accurate.
Developing Secure Storage and Cloud Archiving Protocols
Your workflow does not stop once the photos are edited. How you organize and protect your files after the shoot determines the long-term health of your business, so build a bulletproof storage plan now. Here are the post-production steps that keep your archive secure:
- Standardize Your Metadata - Always apply copyright info, creator details, and basic keywords during the import phase. This makes finding specific photos years later incredibly simple.
- Use the 3-2-1 Backup Strategy - Keep three copies of your files, stored on two different media types, with at least one copy stored off-site.
- Use Smart Cloud Storage - Choose a dedicated backup solution designed specifically for creatives. Imagen’s Cloud storage backup is on the roadmap, so for now rely on a dedicated service you already trust.
- Keep Your Active Catalog Lean - Once an event is delivered, archive the RAW files to cheap cold storage and keep only smart previews on your local NVMe drive. This keeps Lightroom running at peak performance.
- Set Up Auto-Archiving Rules - Use automated software to move projects older than 90 days from your fast SSDs to your high-capacity archive HDDs.
- Automate Client Delivery - Connect your catalog directly to online gallery systems so clients can download their high-res images immediately.
We have all heard the horror stories. A hard drive crashes, and a bride’s wedding photos vanish forever. It is an absolute nightmare that can ruin your reputation and end your business, so do not let it happen to you. Investing in a solid backup system is not optional. It is a fundamental cost of doing business. With modern cloud options offering 100GB of free storage to start, there is no excuse left for skipping an off-site backup. Set it up once, automate it, and stop worrying about data loss for good.
This step is also about managing your physical desk space. Nobody wants a dozen different hard drives cluttering up the editing room. Set up automated archiving rules, and you clean up your workspace while keeping your mind clear. It turns every morning at your desk into a fresh start instead of a fight against digital clutter.
Troubleshooting Common On-Set and Import Disasters
Even with the best tools, you will eventually run into a messy shoot. Maybe the venue was too dark, or maybe you went a little wild with burst mode during the cake cutting. Do not panic here. Here is how to manage the most common headaches without losing your mind:
- The Burst Mode Overload - If you shot 50 frames of a fast-moving dance floor, tell your AI to use strict duplicate grouping. This will cluster those files together, allowing you to fast select the one frame with the perfect motion trail.
- The Out-of-Focus Nightmare - In low-light situations, your camera’s autofocus might hunt, leaving you with soft shots. Use pixel-level sharpness filters to immediately flag and delete everything that isn’t tack-sharp.
- The Flash Sync Failure - If your strobes failed to fire on a few frames, sort your gallery by exposure value. You can quickly batch-delete the dark frames in seconds.
- The Multi-Camera Drift - If your second shooter’s camera clock was off by 12 minutes, use Lightroom’s “Edit Capture Time” tool to align them before you start sorting. This ensures your timeline is perfectly chronological, which is critical for both manual and AI-powered sorting systems.
Here is a simple rule: when you import photos from a second shooter, always rename the files with their initials first. Do this, and you prevent filename conflicts while making it easy to trace specific camera issues later. Skip this step, and you will pull your hair out trying to figure out why some files are not syncing correctly. Trust me, nobody wants to spend a Monday morning renaming 2,000 files by hand.
Always coordinate camera clocks before the shoot begins. This simple 10-second step saves hours of head-scratching during the ingestion phase later. If you forget, find a photo where both cameras captured the same moment, such as the kiss or the cake cutting, and sync the times using that visual anchor.
Tailoring the Process for Different Photography Niches
Not all photography sessions are created equal. A wedding photographer handles massive volumes, while a real estate shooter needs ultra-precise geometry instead. Your sorting strategy needs to adapt to your specific niche. Here is how different genres optimize their selection process.
- Wedding Photography - Speed is the ultimate goal. You’re dealing with thousands of emotional moments, so rely heavily on AI to filter out closed eyes and focus issues first. This lets you spend your energy choosing the key emotional reactions. For more tips, check out our guide on wedding photography workflows.
- Portrait Photography - Expression is everything. Set your AI culling to be very sensitive to eye contact and smiles, allowing you to fast narrow down 50 headshots to the top 3 options. This is a massive lifesaver for portrait photography studios.
- Real Estate Photography - Sharpness and geometry rule here. Focus on weeding out camera shake and choosing the brackets with the cleanest window pulls before merging your HDR exposures. Read our specialized guide on real estate photography processes to master this.
- School and Sports Photography - High-speed tracking is your friend. Sort by subject tags or camera metadata to in no time group individual athletes together for quick package creation.
Here is the deal: trying to force a wedding workflow onto a high-end commercial shoot simply does not work. The artistic tolerances are completely different between the two. Take the time to tweak your AI profiles and manual rules for each project type you take on. You will get far better results, and you will not waste time reviewing files that do not fit the creative brief. It comes down to choosing the right settings for the right job.
Pro Tip: Save unique import and export presets in your culling software for each type of shoot, so you never have to manually adjust settings again.
Maximizing Business Growth by Reclaiming Billable Hours
Step back for a moment and look at the bigger picture. Why obsess over a few seconds per photo at all? Because those seconds add straight up to your business’s bottom line. If you are a professional photographer, your time is your single most valuable asset. When you are stuck in a dark room sorting through files, you are not growing your brand.
Here are the direct ways a fast selection system translates into business growth.
- Faster Delivery Times - Clients are most excited about their photos immediately after the event. Delivering a gallery in 3 days instead of 6 weeks creates an incredible customer experience that drives word-of-mouth referrals.
- More Booking Availability - By cutting your post-production time from 15 hours per shoot to 1.5 hours, you free up physical space in your calendar to book more portrait sessions or high-end commercial shoots.
- Reduced Burnout - Creative fatigue is the number one reason photographers quit after 3 to 5 years. Keeping your work-life balance healthy ensures you’ll stay passionate about your art for decades.
So take a hard look at your current setup. Is it actually working for you, or have you just gotten used to the pain? Honestly, switching to automated tools can feel scary at first, and you might worry about losing control over your artistic vision. But once you see how much time you save, you will never go back to the old way. I have helped countless creatives audit their systems, and the only regret they ever voice is not making the switch sooner. Your time is worth more than manual sorting, so treat it that way.
When you free up 20 hours a week, you are not just sitting on the couch doing nothing. Spend that time building partnerships, improving your marketing, or mastering advanced lighting setups instead. That is how you scale a business from a side hustle into a six-figure studio. The math does not lie here. Automated sorting is the single highest-return investment you can make in your business today.
What’s new in Imagen: Imagen is now an intelligent, agentic Studio for professional photographers, so selection no longer sits in its own corner of your workflow. Cull, edit, review and export in one project, in any order, with AI culling and AI filters such as blur and closed eyes, or sort manually for free. Edited photos arrive in batches, and the Studio is rolling out gradually as a beta.
Frequently Asked Questions
Can AI culling handle RAW files from any camera manufacturer?
Yes, modern AI sorting tools support RAW files from all major camera brands, including Canon, Nikon, Sony, Fujifilm, and Leica. The software reads the raw metadata and embedded JPEG previews directly, which lets it run lightning-fast quality checks without requiring any file conversion.
How does the duplicate detection algorithm work on fast bursts?
The AI analyzes visual similarity, capture time, and composition to group rapid-fire burst sequences together. It then compares pixel-level sharpness and facial expressions to automatically suggest the single best frame from the entire sequence.
Will using automated culling delete original files from my hard drive?
No, reputable platforms like Imagen are completely non-destructive. They only apply ratings, flags, or color codes, which you can send to Lightroom Classic as XMP, so your original RAW files stay safe and untouched on your drive.
What’s the recommended number of photos to train a Personal AI Profile?
To build an accurate, custom-trained profile that matches your editing style closely, we recommend uploading a minimum of 5,000 photos from past Lightroom catalogs. That gives the neural network enough data to learn your exposure, contrast, and color preferences.
Can I use AI culling offline when traveling or shooting on location?
While some basic sorting features can run locally, most advanced machine-learning analysis needs an active internet connection to process files through cloud servers. That said, you only need to upload lightweight previews, so a standard mobile hotspot is usually more than fast enough.
Does AI sorting work for second-shooter files with different camera bodies?
Yes, it does, because the AI analyzes the actual visual content of each frame rather than relying solely on camera settings. It automatically groups similar scenes even when they were shot on different camera brands or with varying focal lengths.
Is there a free trial or entry-level plan for photographers with low volume?
Yes, Imagen pricing lets you explore the tools for free and pay only when you export, using a flexible pay-as-you-go system. There are also fixed-fee plans for high-volume studios that want unlimited sorting and editing features.
How does the crop and straighten feature handle artistic Dutch angles?
The AI is smart enough to tell the difference between an intentional creative tilt and an accidental crooked horizon. If you want to keep your artistic angles intact, simply disable the automated straightening tool or adjust its sensitivity settings in your profile preferences.
Can I manually override the AI’s selections inside Lightroom?
Yes, you retain full control over the final gallery at every step. Once the AI applies its ratings and flags, you can filter, change, or remove any selection inside Lightroom Classic, just as you would with a traditional manual workflow.
