

Photo Culling Takes Hours? 7 Ways to Speed Up Your Workflow
Table of contents
- Key Takeaways
- Imagen AI Culling
- AfterShoot Culling
- Narrative Select
- Photo Mechanic
- FilterPixel
- Adobe Lightroom Classic (Native Workflow)
- Adobe Bridge
- Capture One Pro
- Comparison and Final Recommendation
- Frequently Asked Questions
- Can AI completely replace manual culling?
- How much time can I realistically save with these tools?
- Do these AI tools work with any camera or RAW file?
- Is my data safe when I upload photos to a cloud-based culling service?
- What’s the difference between culling and editing?
- Do I need a powerful computer to run these programs?
- Can AI help cull genres other than weddings and portraits?
- What does “perpetual license” mean?
- How does AI detect if an eye is closed?
You’ve just returned from a massive shoot. Thousands of photos are sitting on your hard drive, waiting. And the dread sets in. The tedious, soul-crushing process of culling-picking the keepers from the duds-is about to eat up your entire day, maybe even two. You’re not alone. The average professional photographer spends a staggering 28% of their work time on post-production, a huge chunk of which is just sorting through files.
But what if it didn’t have to be this way? What if you could reclaim those lost hours? This isn’t a list of vague tips; it’s a deep-explore the specific tools and workflows that slash culling time from hours to minutes. The selection criteria for this list are strict: we’re looking at pure processing speed, the accuracy of any AI involved, how well a tool integrates with industry standards like Lightroom, and its overall cost-to-value ratio. We’ve evaluated everything from traditional high-speed browsers to groundbreaking AI assistants.
Key Takeaways
- AI is Dominating Culling: AI-powered tools like Imagen can cull 1,000 images in under 5 minutes, a task that typically takes a human 1-2 hours, representing a massive time savings.
- Volume is the Bottleneck: With wedding photographers capturing 2,500 to 4,000 images per event, manual culling has become unsustainable for a profitable business model.
- Local vs. Cloud Processing: You must choose between cloud-based AI (like Imagen) for power and accessibility, or local software (like AfterShoot) for offline capability and a single annual fee.
- Manual Culling Isn’t Dead, Just Faster: Tools like Photo Mechanic and Narrative Select don’t automate choices but make manual selection dramatically faster by rendering RAW files instantly. Narrative claims its ‘Close-ups’ panel reduces time spent checking focus by 60%.
- Fatigue is a Real Cost: Your decision-making accuracy drops by 15% after just 45 minutes of a repetitive task like culling. Automation isn’t just about speed; it’s about maintaining quality control.
- The Market is Growing Fast: The AI in photography market is projected to grow at a CAGR of 18.5% through 2030, meaning these tools will only get better and more integrated into standard workflows.
- Cost Varies Wildly: Solutions range from free (Adobe Bridge) to pay on export (Imagen) to significant one-time purchases (Photo Mechanic Plus at $399), so you can find a tool that fits your budget.
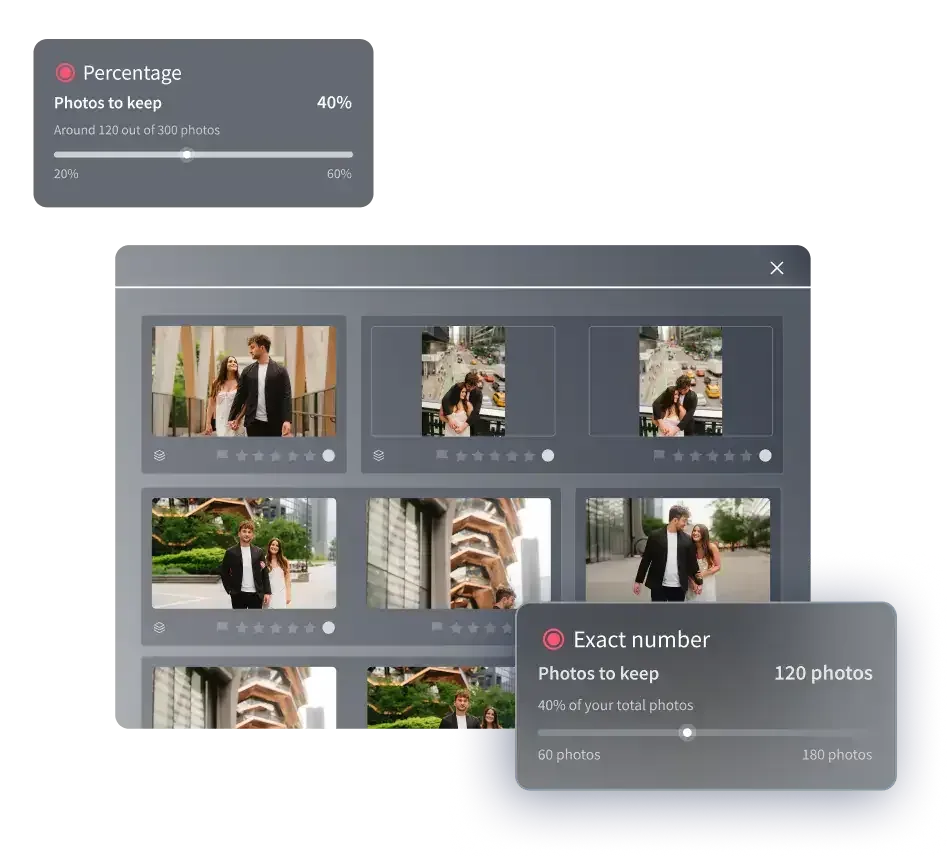
Imagen AI Culling
Imagen isn’t just another tool; it’s a fundamental shift in how photographers can approach post-production. It’s an intelligent Studio, a desktop app with the AI processing in the cloud, that uses artificial intelligence not only for culling but also for editing, in one connected project. The core idea is simple: let a highly trained AI handle the most repetitive, time-consuming parts of your job so you can focus on the creative aspects.
For culling, Imagen analyzes your entire photo set for technical and aesthetic qualities. It flags images with closed eyes, poor focus, or bad composition, then groups similar photos and picks the best one from each set. The result? Instead of you sifting through 4,000 photos from a wedding, the AI presents you with a pre-culled gallery of a few hundred top selects, which you can then quickly review and adjust. AI culling is optional, and manual culling is free.
Key Features of Imagen:
- Automated Selections: The AI automatically identifies and tags rejected photos based on closed eyes, critical out-of-focus areas, and poor lighting or composition.
- Duplicate & Sequence Grouping: It intelligently groups visually similar photos (like burst shots) and highlights the sharpest, best-composed option as the top choice.
- Personalized Preferences: While it works out of the box, its real power comes from its integration with Imagen’s AI profiles for editing. The system can learn your stylistic tendencies over time.
- Direct Lightroom Classic Integration: This is a big one. The culling results-picks, rejects, and color labels-are synced directly back to your Lightroom catalog. There’s no complex export and import process.
- Cloud-Based Power: Because the processing happens on Imagen’s servers, it doesn’t slow down your local machine. You can upload a shoot and go to dinner; it’ll be done when you get back.
The pricing model is also a significant departure from the subscription-heavy market. Alongside its AI photo culling, Imagen offers pay-as-you-go pricing: exploring the tools is free, and you pay for what you export. This suits photographers with inconsistent schedules, because a quiet month means few exports and you are not tied to a large subscription you are not using.
Honestly, the biggest hurdle is psychological: trusting an AI with a creative decision. But after seeing it work, you realize it’s not making the final creative choice. It’s doing the janitorial work of removing the objectively bad photos, leaving you with a much smaller, higher-quality pool of images to apply your artistry to. For a wedding photographer, this workflow can genuinely return days of your life each month.
AfterShoot Culling
So, what if you’re not always connected to the internet, or you’re just wary of uploading thousands of RAW files to the cloud? That’s where AfterShoot comes in. It’s a powerful AI culling application that runs entirely on your local machine. You don’t need an internet connection after the initial installation and activation. This makes it an ideal companion for photographers who travel frequently or have slow upload speeds.
AfterShoot’s approach is centered on visibility and control. Once you import a folder of images, its AI gets to work, presenting you with a clear dashboard. It automatically groups duplicates, shows you close-ups of every face in a group shot, and provides warnings for blurriness or closed eyes. You get detailed sliders to adjust the AI’s sensitivity. Want it to be stricter about sharpness? Just crank up the “Blurry” slider.
Pros and Cons of AfterShoot
Here’s a breakdown of where it shines and where it falls short.
The Good Stuff:
- Completely Offline Operation: This is its defining feature. You can cull a wedding on a laptop in a hotel room with spotty Wi-Fi without any issues.
- Unlimited Culling: The pricing model is a flat annual fee. Whether you cull 10,000 or 100,000 photos in a year, the cost is the same. This predictability is great for high-volume photographers. AfterShoot offers tiers at $120, $240, and $480 per year.
- Granular Control: The user interface is filled with toggles and sliders that let you fine-tune the AI’s criteria. This is perfect for photographers who want AI assistance but don’t want to completely hand over the reins.
- Visual Grouping: The way it stacks duplicates and similar shots is very intuitive. It makes it fast to scan a burst sequence and confirm the AI’s choice for the best shot.
The Not-So-Good Stuff:
- Resource Intensive: Because all the processing happens on your computer, AfterShoot can be demanding on your CPU and RAM, especially when analyzing thousands of high-megapixel RAW files. Older machines might struggle.
- Upfront Cost: Unlike a pay-per-use model, you’ve a significant annual bill. If you’ve a slow season, you’re still paying the full rate.
- AI Speed vs. Cloud: While fast, local processing can’t always match the raw distributed power of a cloud-based system like Imagen’s. A very large shoot might still take a bit longer to process locally.
Verdict: AfterShoot is the best choice for photographers who prioritize offline access and prefer a predictable, fixed annual cost for unlimited culling. It’s a workhorse for those who want AI to assist, not fully automate, their selection process.
Narrative Select
What if your main bottleneck isn’t the decision-making itself, but the sheer technical lag of waiting for RAW files to render? Every click, a half-second pause. Over thousands of images, that adds up to hours. Narrative Select is built to solve this specific problem. It’s less of an automated culler and more of a supercharged, AI-assisted image browser designed for one thing: speed.
Its primary claim to fame is its near-instant rendering of RAW files. You can fly through a folder of images with zero lag. But it doesn’t stop there. It has smart, targeted AI features to speed up your manual decisions. Here are a few tips for getting the most out of it:
- Lean on the ‘Close-ups’ Panel: This is its killer feature. For any group shot, the panel on the right instantly shows you a zoomed-in view of every single face detected in the frame. No more tedious zooming in and panning around to check for blinks or missed focus. Narrative claims this single feature reduces the time spent checking faces by 60%.
- Trust the Color-Coded Warnings: As you browse, Select will flash yellow or red warnings directly on the images. Yellow might mean a subject’s eyes are partially closed or the focus is slightly soft. Red indicates a definite blink or a completely missed focus. You can use these visual cues to instantly discard shots without a second thought.
- Use the Scene Grouping Feature: The app automatically groups photos that were taken at the same time in the same location. This helps you mentally chunk your culling process, tackling one part of the day at a time, which is far less overwhelming than staring at a giant wall of 4,000 thumbnails.
The pricing is flexible, with a capable free version and a Pro version for $18 per month (billed annually) that unlocks more advanced features. The biggest drawback? It’s currently macOS only, which immediately rules it out for a large portion of the industry. The AI is also more of an assistant-it points things out but doesn’t make the “keep” or “reject” decision for you like Imagen does. But that’s the point. It’s for the control freak who just wants a faster car, not a chauffeur.
Verdict: If you’re a Mac user who wants to maintain full manual control over the culling process but are sick of software lag, Narrative Select is your best friend. It’s a beautifully designed tool that focuses on removing technical friction from your workflow.
Photo Mechanic
Before AI culling was even a concept, there was Photo Mechanic. For decades, it has been the undisputed king of speed for photojournalists, sports photographers, and anyone else who needs to ingest, sort, and caption photos on a tight deadline. This isn’t a tool for automated selection; it’s a tool for raw browsing speed. It’s built for professionals who know what they’re looking for and just need to get to it, fast.
How does it achieve this speed? Photo Mechanic doesn’t render the full RAW file initially. Instead, it pulls the high-quality JPEG preview that’s embedded inside every RAW file. This means you can view images instantly, without the rendering lag that plagues even powerful editors like Lightroom. You can blast through hundreds of photos in minutes, tagging the keepers as you go.
The primary bottleneck in any high-volume workflow isn’t just the AI’s processing time; it’s the human review phase. A tool that provides instant, high-resolution previews for manual verification, like Photo Mechanic, can sometimes save more practical time than a fully automated system that still requires a lengthy final check.
Itamar Haim, AI Photography Workflow Specialist
Think of it like this: if you’re shooting a major league baseball game, you don’t need an AI to tell you which photo is the game-winning catch. You need to find that photo out of 2,000 shots, add the correct caption and metadata, and send it to the Associated Press before the game even ends. That’s the world Photo Mechanic was built for. Here’s a quick guide to its core workflow:
- Ingest from Card: Use the Ingest feature to copy photos from your memory card to your computer. During this process, you can simultaneously back up to a second drive, apply a baseline metadata template (with your name, copyright, etc.), and even rename the files based on variables like date, time, or sequence number.
- First Pass with Color Tags: Fly through your photos in the contact sheet view. Use the number keys (1-5) to apply color labels to potential keepers. Because there’s no lag, you can do this almost as fast as you can press the keys.
- Filter and Refine: Once you’ve made your first pass, filter the view to show only the photos you’ve tagged. Now you can compare just the best shots side-by-side to make your final selections.
- Add IPTC Metadata: This is where it’s truly powerful. Use the metadata editor to add detailed captions, keywords, headlines, and other information to your final selects. This data is written to the file’s sidecar and is read by almost every photo agency and editor in the world.
A perpetual license for Photo Mechanic 6 is $229, while the more advanced Photo Mechanic Plus (which includes a full-fledged image database manager) is $399. There are no subscriptions. It’s a steep one-time cost, but for working professionals who rely on its speed, it pays for itself very quickly. The learning curve for its advanced metadata features is steep, and it offers absolutely zero AI assistance. But for pure ingestion and browsing velocity, it remains undefeated.
FilterPixel
Imagine a scenario: you’re a portrait photographer who loves the idea of AI culling but finds the all-or-nothing approach of some tools intimidating. You want guidance, not a final verdict. You want an AI that acts as a helpful first assistant, sorting your photos into neat piles for you to review. This is the niche that FilterPixel fills beautifully.
FilterPixel analyzes your photos and automatically tags them as ‘Accepted’, ‘Rejected’, or ‘Warnings’. The ‘Rejected’ pile contains the obvious duds: people with eyes closed, photos that are completely out of focus. ‘Warnings’ are for images that are technically imperfect but might still be usable-maybe the focus is slightly soft, but the emotional content is perfect. ‘Accepted’ is, of course, the top-tier pile. This initial sort saves you the trouble of looking at the worst 10-20% of your photos at all.
Its interface is one of the most user-friendly of the bunch. It presents similar images side-by-side, making it easy to pick the strongest one from a burst. The AI’s decisions are transparent; you can see exactly why a photo was flagged, and you can easily override its suggestions. This makes it a great entry point for photographers who are new to AI workflows.
Let’s consider a practical example: a family portrait session.
- You shot 800 photos.
- You import them into FilterPixel. The AI takes about 10-15 minutes to analyze them.
- It automatically tags 150 photos as ‘Rejected’ (blinks, total misfires). You don’t even have to look at them.
- It tags another 100 photos with ‘Warnings’ (some softness, a slightly awkward expression). This is where you’ll focus your attention first.
- The remaining 550 photos are ‘Accepted’. You can now browse this pre-filtered group, knowing that the technical garbage has already been taken out.
This process transforms your job from sifting through 800 images to reviewing a much more manageable set. The pricing is also accessible, with a Standard plan at $11.99/month and a Pro plan at $19.99/month. This makes it a lower-risk option than committing to a large annual plan. The main downside is that its AI can sometimes be a bit overzealous in its ‘Rejected’ tagging, and its user base is smaller, which can mean slower feature development compared to its bigger competitors. But for photographers who want a simple, affordable AI assistant, it’s a fantastic middle-ground solution.
Adobe Lightroom Classic (Native Workflow)
Before you spend a dime on new software, it’s worth asking: are you getting the absolute most out of the tool you already use every day? Adobe Lightroom Classic, used by an estimated 70% of professional photographers, has several built-in features designed to speed up culling. While it lacks any true AI selection logic, optimizing your manual process within Lightroom can still save a significant amount of time, especially for lower-volume shoots.
The key is to avoid letting Lightroom render its high-quality previews on the fly as you cull. That’s what causes the frustrating lag between photos. Here’s a step-by-step process for a faster native Lightroom workflow:
- Import with Smart Previews: On the import screen, make sure you check the box to “Build Smart Previews.” These are smaller, lightweight DNG files that Lightroom can work with much faster than the original RAWs. This step takes time upfront, but it pays off during culling.
- Switch to Library Module: Do all your culling in the Library module, not the Develop module. The Library module is designed for speed and organization, while the Develop module is for intensive, single-image editing.
- Engage Auto-Advance: This is a simple but powerful feature. With Caps Lock on, whenever you assign a rating or a flag (like pressing ‘P’ for Pick), Lightroom will automatically advance to the next photo. This eliminates thousands of extra keystrokes (the right arrow key) over the course of a shoot.
- Use Survey Mode and Compare Mode: Have a bunch of similar shots? Select them all and press ‘N’ to enter Survey Mode. This shows them all on one screen, allowing you to quickly eliminate the weaker ones by clicking the ‘X’ on their thumbnail. To compare just two photos side-by-side, select them and press ‘C’ for Compare Mode. You can even zoom in on both images simultaneously to check for critical sharpness.
The biggest pro here’s obvious: it’s a workflow that exists entirely within one application. There’s no need to move files around, which simplifies data management. It’s also included in your existing Creative Cloud Photography Plan ($9.99/month). The major con is that even with these optimizations, it will never be as fast as dedicated browsers like Photo Mechanic or as automated as an AI culler like Imagen. But for photographers who only shoot a few sessions a month, mastering the native Lightroom workflow might be all the optimization they need.
Adobe Bridge
What if you want a faster way to browse and rate your photos without the overhead of a Lightroom catalog, and you want it for free? That’s the exact role Adobe Bridge is designed to fill. It’s a powerful media asset manager that has been part of Adobe’s ecosystem for years. Think of it as a supercharged file browser that understands photographer-specific needs like RAW files, metadata, and ratings.
Because Bridge doesn’t use a catalog system like Lightroom, it can feel much snappier for browsing folders. It simply reads the files directly from your hard drive. Here’s a checklist for when using Bridge as your culling tool makes the most sense:
- ☐ You’re on a Tight Budget: Bridge is 100% free. You just need a free Adobe ID to download and use it. This makes it the most accessible option on this list for improving your culling speed without any financial investment.
- ☐ You Hate the Lightroom Catalog System: Some photographers find Lightroom’s catalog cumbersome. If you prefer a simple folder-based organization system, Bridge is a perfect fit. You browse your folders directly, just like in Windows Explorer or macOS Finder, but with much more powerful tools.
- ☐ You Need to Sort Multiple File Types: Bridge isn’t just for photos. If your project includes RAW files, JPEGs, videos, and design files (like PSDs or AI files), Bridge lets you see and organize all of them in one place.
- ☐ You Want Ratings to Sync with Adobe Camera Raw: Any star ratings, color labels, or pick/reject flags you apply in Bridge are written to a sidecar file that’s immediately recognized when you open that photo in Adobe Camera Raw or import it into Lightroom. Your culling work is never lost.
The workflow is straightforward. Open a folder of images in Bridge, use the full-screen ‘Review Mode’ to cycle through them quickly, and use keyboard shortcuts to apply ratings and labels. Once you’re done, you can filter the view to show only your 5-star picks and then open them directly in Photoshop or import just that selection into Lightroom. The primary drawbacks are a lack of AI features and the potential for lag when browsing folders with many thousands of ultra-high-resolution RAW files. But as a zero-cost upgrade to culling in your operating system’s file browser, it’s an absolute major improvement.
Capture One Pro
In the world of professional photo editing, Capture One Pro has long been the primary rival to Lightroom, especially favored by commercial, fashion, and studio photographers for its legendary color science and strong tethered shooting capabilities. But it’s also a powerful tool for culling, with features designed for high-end, high-resolution workflows where image quality is paramount.
Recent trends in photo software show a push towards all-in-one solutions, and Capture One is no exception. It has been steadily improving its organizational and culling tools to compete more directly with Lightroom’s library module and dedicated culling apps. Its performance in rendering its own RAW files is often faster than Lightroom’s, providing a smoother manual culling experience.
Here are some of the key features Capture One Pro offers for a faster culling workflow:
- The ‘Cull’ View: This dedicated workspace is designed for rapid sorting. It provides a large viewer, a filmstrip of your images, and tools for rating, tagging, and zooming to check focus quickly.
- Group by ‘Similar’: Capture One has a feature that can automatically analyze and group photos that are visually similar. This is particularly useful for portrait sessions where you might have 15 shots of the same pose. It groups them into a stack, allowing you to quickly expand it, find the one with the perfect expression, and collapse the rest.
- Focus Mask: This tool overlays a colored highlight on the areas of your photo that are in sharpest focus. Instead of zooming to 100% on every image, you can enable the focus mask and see at a glance if the eyes are sharp, saving precious seconds on every photo.
- Instant Tethered Culling: For studio photographers, this is a massive advantage. As photos are shot tethered to the computer, they appear instantly in Capture One. An art director or the photographer can rate and cull the images live during the shoot, meaning the selection process is often complete by the time the camera is put down.
The main hurdles with Capture One are its price and its learning curve. At $299 for a perpetual license or $24 per month for a subscription, it’s one of the most expensive options. Its interface is also more complex than Lightroom’s. While it’s beginning to incorporate AI features, they’re not as developed as the dedicated culling tools like Imagen or AfterShoot. However, for photographers already invested in the Capture One ecosystem for its superior image quality, mastering its native culling tools is the most efficient path forward.
Comparison and Final Recommendation
Choosing the right tool depends entirely on your specific needs, shooting volume, and budget. There’s no single “best” solution, only the best solution for you. Here’s a direct comparison of the tools we’ve covered:
| Tool | Speed | AI Capability | Price | Best For |
|---|---|---|---|---|
| Imagen AI Culling | Exceptional (Cloud-based) | Fully Automated Selections | Pay on export | High-volume wedding & event photographers |
| AfterShoot | Very Good (Local) | AI-Assisted (High Control) | $120-$480/year | Photographers needing offline access & unlimited culls |
| Narrative Select | Instant (Manual Browsing) | AI Face/Focus Detection | $18/month (Pro) | Mac users wanting the fastest manual culling experience |
| Photo Mechanic | The Fastest (Manual Browsing) | None | $229 (Perpetual) | Photojournalists & sports shooters needing speed & metadata |
| FilterPixel | Good (Cloud/Local) | AI-Assisted Sorting | $12-$20/month | Portrait photographers wanting an easy entry into AI culling |
| Lightroom Classic | Moderate (Manual) | None | $9.99/month (Plan) | Low-volume shooters wanting an all-in-one workflow |
| Adobe Bridge | Good (Manual Browsing) | None | Free | Beginners or those on a zero-dollar budget |
| Capture One Pro | Very Good (Manual) | Basic AI Grouping | $299 (Perpetual) | Studio & commercial photographers prioritizing image quality |
Our Recommendations
After reviewing the options, here are our final recommendations for different types of photographers:
- For Maximum Automation and Time Savings: Imagen is the clear winner. If you’re a high-volume wedding, event, or portrait photographer, the ability to upload a shoot and have it 90% culled for you is transformative. Paying on export aligns your costs directly with your workload, which is a huge benefit, and the new Studio lets you edit, review and export in that same project.
- For the Offline Power User: AfterShoot is your best bet. If you value local processing, want a fixed annual cost for unlimited use, and desire a high degree of control over the AI’s parameters, it’s a rock-solid choice.
- For the Manual Speed Demon: Photo Mechanic remains the champion. If your job depends on getting photos ingested, tagged, and captioned in the shortest possible time, nothing else comes close. It’s an essential tool for sports, news, and event photography.
The future of culling is undoubtedly driven by AI, but the best tool for you today is the one that removes the most friction from your specific workflow, giving you back your most valuable asset: time.
What’s new in Imagen: Imagen is now an intelligent, agentic Studio for professional photographers, one project where you cull, edit, review and export in any order. For a faster cull, use AI culling plus AI filters such as blur and closed eyes to narrow a shoot, or cull manually for free. An assistant can also find photos when you ask in plain language, with you steering the result. The Imagen beta is rolling out gradually.
Frequently Asked Questions
Can AI completely replace manual culling?
Not yet. AI is incredibly effective at removing the technically flawed images-blurry, blinking, poorly exposed shots. However, it can’t always grasp the subtle emotional nuances that make a photo special. The best workflow is using AI for a massive first cut, then doing a quick manual review of the AI’s selections to make the final creative choices.
How much time can I realistically save with these tools?
It depends on your volume, but the savings are substantial. For a typical wedding with 3,000 photos, manual culling can take 4-6 hours. An AI tool like Imagen can deliver a culled gallery in under 20 minutes, which you might then spend another 30 minutes reviewing. You’re reducing a full day’s work to less than an hour.
Do these AI tools work with any camera or RAW file?
Most modern AI culling tools support RAW files from all major camera manufacturers, including Canon, Nikon, Sony, Fuji, and more. They’re constantly updated to support new camera models as they’re released. However, it’s always a good idea to check the specific tool’s supported camera list before purchasing.
Is my data safe when I upload photos to a cloud-based culling service?
Reputable cloud-based services like Imagen use secure, encrypted connections for all uploads and storage. They have strict privacy policies to ensure your photos are only used for the purpose of culling and editing your own work. Your images aren’t used to train AI for other photographers without your explicit consent.
What’s the difference between culling and editing?
Culling is the process of selecting the best photos from a shoot-choosing which ones to keep and which to discard. Editing (or post-processing) is the subsequent step where you adjust things like color, exposure, contrast, and other attributes on the photos you’ve decided to keep.
Do I need a powerful computer to run these programs?
For cloud-based tools like Imagen, your computer’s power doesn’t matter much since the heavy lifting is done on their servers. For local software like AfterShoot or Photo Mechanic, a more powerful computer with a fast processor, ample RAM (16GB or more), and a speedy SSD will provide a much smoother experience.
Can AI help cull genres other than weddings and portraits?
Absolutely. While much of the marketing is focused on people-centric photography (due to features like blink detection), the core AI analysis of focus, composition, and lighting is applicable to any genre. It can be useful for real estate, product, or even landscape photography to quickly filter out technically poor shots.
What does “perpetual license” mean?
A perpetual license means you pay a one-time fee to own the software forever. For example, when you buy Photo Mechanic for $229, you can use that version of the program indefinitely. You may have to pay for major future upgrades (e.g., from version 6 to version 7), but you won’t have a recurring monthly or annual bill.
How does AI detect if an eye is closed?
AI models are trained on massive datasets containing millions of photos of faces. They learn to recognize the patterns, shapes, and pixels that constitute an open eye versus a closed eye or a partial blink. The AI scans each face in your photo and compares it to these learned patterns to make a highly accurate determination.
