
How to Cull Photos Faster: The Ultimate Guide for 2026
Table of contents
- Key Takeaways
- Prerequisites for High-Speed Culling
- Step 1: Optimize Your Import and Preview Strategy
- Step 2: Automate the First Pass with AI Culling
- Step 3: Execute a High-Speed Manual Refinement
- Step 4: Use Keyboard Shortcuts and External Controllers
- Step 5: Final Review and Syncing to Editing
- Solving Common Culling Hurdles
- Frequently Asked Questions
- Can I trust AI with a once-in-a-lifetime event like a wedding?
- How does AI culling handle subjective or artistic photos?
- What’s the difference between AI culling and AI editing?
- How does Imagen pricing work for culling?
- Will AI culling work with my Capture One workflow?
- How much time can I realistically expect to save?
- Is cloud-based or local culling faster?
- Can I customize the AI’s culling preferences?
You’ve just wrapped an incredible 10-hour wedding shoot. The moments you captured were pure powerful, but now comes the part every photographer dreads: culling. You’re staring at 4,000 RAW files, knowing you’ll spend the next five, maybe six, hours sifting through them. That’s a full day of work just to find the keepers, and it’s a major reason why 62% of professional photographers identify post-processing as their biggest business bottleneck.
But what if you could crush that entire culling process in under 30 minutes? It’s not a fantasy; it’s the new reality with AI-powered workflows. This guide will walk you through the exact steps to overhaul your culling process, using modern tools and techniques to reclaim your time and get back to what you love: shooting and creating.
Key Takeaways
- Dramatic Time Savings - AI-powered culling tools like Imagen AI photo culling can reduce the time you spend culling by up to 90%, turning a 5-hour task into a 30-minute review.
- Hardware is Non-Negotiable - Using an NVMe Gen4 SSD can reduce image thumbnail generation time by 60% compared to older SATA SSDs, directly impacting culling speed.
- Smart Previews are Essential - Working with Smart Previews in Lightroom Classic can make browsing and selecting photos up to 400% faster than culling directly from full-resolution RAW files.
- AI Accuracy is Here - Modern AI algorithms achieve over 98% accuracy in identifying objective flaws like closed eyes and out-of-focus shots, handling the most tedious part of the job for you.
- Efficiency Starts at Import - Your culling process begins the moment you import photos. A disorganized folder structure or a slow preview generation strategy will sabotage your speed before you even start.
- A Hybrid Approach Wins - The fastest workflow combines AI for the initial heavy lifting (removing the clear rejects) with a rapid manual pass to choose the subjective, emotional winners.
- Most Photos are Rejects - Professionals typically deliver only 10-15% of photos captured. This means an effective culling strategy needs to quickly eliminate 85-90% of the images from a shoot.
Prerequisites for High-Speed Culling
Before you even think about hitting the ‘import’ button, you need to set the stage for speed. A sluggish culling process isn’t just about your technique; it’s often a direct result of a poorly optimized environment. Think of it like a chef preparing their station before service begins. You wouldn’t start dicing vegetables with a dull knife and a cluttered cutting board, would you? The same principle applies here. Getting your hardware, software, and file organization right from the start is non-negotiable if you want to fly through your culling.
Your Hardware Checklist
Your computer’s components are the engine of your workflow. Trying to cull thousands of RAW files on an underpowered machine is a recipe for frustration.
- Storage Drive - A fast internal SSD is the single most important hardware component for culling speed. An NVMe Gen4 SSD is the gold standard in 2026, reducing thumbnail generation time by a massive 60% compared to older SATA SSDs. Don’t cull from an external spinning hard drive. Just don’t.
- RAM - 32GB of RAM is the minimum for a smooth experience with large catalogs and high-megapixel RAW files. If you frequently work with 50MP+ cameras or have multiple applications open, 64GB is a worthwhile investment.
- Processor (CPU) - A modern CPU with a high single-core clock speed will directly impact how quickly your app can generate previews and respond to your commands.
- Graphics Card (GPU) - Ensure GPU acceleration is enabled in your editing software (like Lightroom Classic or Capture One). This offloads some of the processing from the CPU, making the entire interface feel snappier.
Software and File Organization
Hardware is only half the battle. How you manage your files and configure your software is just as critical.
- Up-to-Date Software - Always run the latest version of your primary photo editor and any culling tools. Performance improvements and bug fixes are rolled out constantly.
- Consistent Folder Structure - Create a logical, repeatable folder structure for every single client. A common professional method is `YEAR > YYYY-MM-DD_ClientName > 01_RAW`. This predictability saves mental energy and makes finding files effortless.
- Centralized Catalog - Keep a single master catalog for your editing app (like Lightroom) on your fastest internal drive. A fragmented system with multiple catalogs is a surefire way to slow things down.
- Regular Maintenance - Just like a car, your software needs a tune-up. Regularly optimize your Lightroom catalog and clear your software’s cache to keep it running at peak performance.
Step 1: Optimize Your Import and Preview Strategy
The race for speed is won or lost at the import stage. Seriously. If you import thousands of photos and immediately try to cull them while Lightroom chugs away building standard previews in the background, you’ve already failed. The secret is to decouple the culling process from the heavy, cumbersome RAW files as quickly as possible.
For a typical wedding photographer shooting 2,000 to 4,000 images, this step is absolutely crucial. You can’t afford to wait for your computer to catch up. You need a strategy that lets you start making decisions instantly.
- Import and Build Smart Previews: On import, select the option to build Smart Previews. Yes, this adds time to the initial import process, but it pays massive dividends later. A Smart Preview is a lightweight, fully editable DNG file that stands in for your original RAW.
- Disconnect Your RAWs (Optional but Recommended): Once the import and Smart Preview generation is complete, you can (if you’re brave) disconnect the external drive containing the original RAW files. Lightroom will now run exclusively off the tiny Smart Previews stored on your fast internal drive.
- Experience the Speed Difference: Now, start culling. You’ll notice an immediate, dramatic improvement. According to Adobe’s own data, culling with Smart Previews can increase image switching and browsing speed by up to 400%. The lag is gone. You can flick between photos almost instantly, allowing your brain to enter a state of flow.
Think of it this way: culling from RAW files is like trying to judge a book by reading the entire manuscript of every volume in a library. Culling with Smart Previews is like reading just the back-cover summaries. You get all the information you need to make a decision, but in a fraction of the time and with a fraction of the effort.
Step 2: Automate the First Pass with AI Culling
Here’s the part nobody tells you about being a professional photographer: a huge portion of the culling process is just objective math. Is the photo in focus? Are the subjects’ eyes open? Is this one of 15 near-identical duplicates from a burst shot? These aren’t creative decisions; they’re technical ones. And computers are exceptionally good at math.
This is where an AI-powered tool like Imagen becomes your indispensable assistant. It handles the boring, repetitive parts so you can save your creative energy for what truly matters: selecting the photos with the most emotional impact. The goal isn’t to let the AI do 100% of the work. It’s to let it do the first 80% of the grunt work.
Using the AI photo culling feature is straightforward. Imagen’s engine can process and rank 1,000 high-resolution RAW photos in under 5 minutes, a task that would take a human close to an hour.
- Upload Your Photos - You can upload your photos directly from the Imagen desktop app. It then gets to work analyzing every single file.
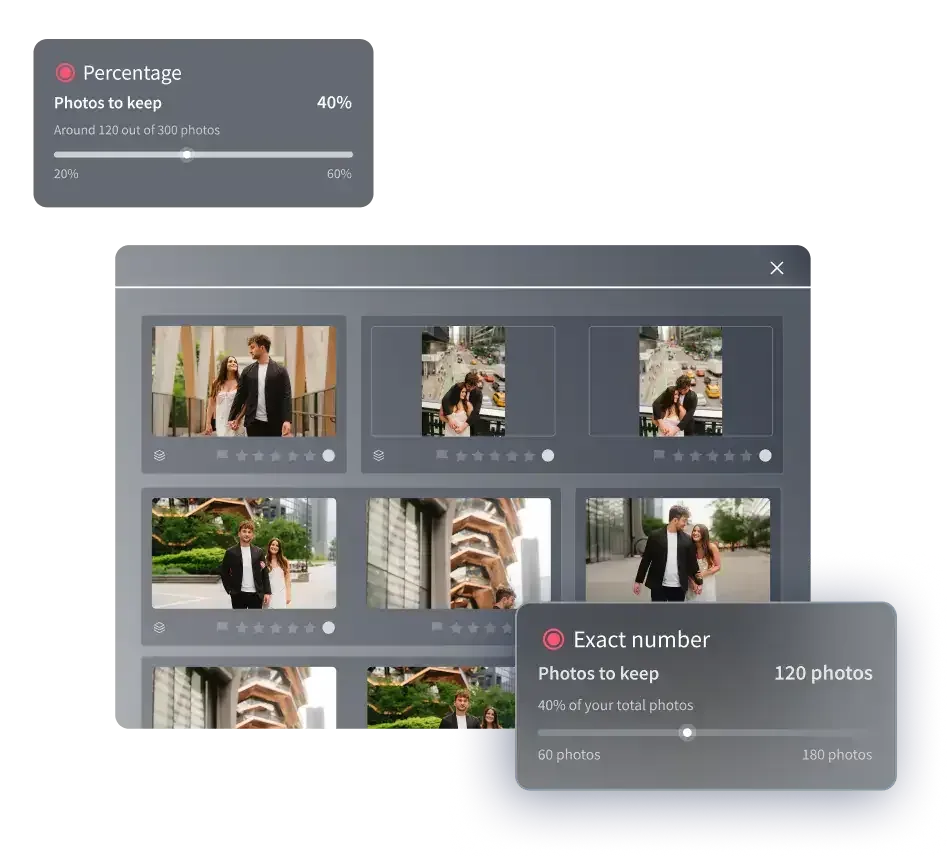
- Set Your Preferences - You can tell the AI how strict you want it to be. It will analyze for critical technical flaws, achieving over 98% accuracy in detecting issues like closed eyes and critical focus misses.
- Let the AI Group and Rank - This is the powerful. Imagen doesn’t just flag bad photos. It groups similar photos (like those burst sequences) together, analyzes the composition and facial expressions within each group, and then selects the single best shot from the set.
- Review the Results - Instead of a mountain of 4,000 unsorted photos, you’re presented with a curated selection. The definite rejects are separated, the duplicates are grouped with a “best of” recommendation, and the likely keepers are all neatly organized. Your job has just been reduced from culling to simply reviewing and refining.
The primary value of AI in a creative workflow isn’t replacing the artist, it’s removing the friction. By automating the technical, repetitive tasks like initial culling, AI frees up a photographer’s most valuable resources: their time and their creative decision-making capacity. It shifts the focus from ‘what’s technically usable?’ to ‘what’s artistically powerful?’
Itamar Haim, AI Photography Workflow Specialist
Step 3: Execute a High-Speed Manual Refinement
Once the AI has cleared the forest of all the obvious rejects, you’re left with a beautiful grove of high-potential photos. Now it’s your turn to apply the human touch. This second pass isn’t about looking for flaws; it’s about looking for feeling. Your goal is to move through this curated list as quickly and decisively as possible. This is where you build rhythm and muscle memory.
Without AI, this manual process can take an agonizing 3 to 5 hours for a full wedding. With the AI-culled list, you can often get it done in under 30 minutes. Here’s how.
The “Yes/No/Maybe” Method
Forget complex star ratings or color labels for now. Your brain works fastest with simple binary choices. Your only job in this phase is to make one of three decisions for each photo.
- Use ‘P’ for Pick (Yes) - If the photo is a definite keeper, hit the ‘P’ key in Lightroom. Don’t overthink it. If it feels right, it’s right.
- Use ‘X’ for Reject (No) - If the photo doesn’t make the cut, hit ‘X’. This marks it for deletion. Be ruthless.
- Do Nothing for Maybe - If you hesitate for more than a second, just leave it unflagged and move on. You can come back to the “maybes” later if you need more photos, but you probably won’t.
Pro Tip: The 1-Second Rule
Train yourself to make a decision on every photo in one second or less. This sounds impossible at first, but it’s a skill you can develop. Your gut reaction is almost always the right one. The longer you stare at an image, the more you’ll talk yourself into or out of it, leading to decision fatigue. Trust your instincts and keep the momentum going. Turn on “Auto-Advance” (often by enabling the Caps Lock key in Lightroom) so that as soon as you press ‘P’ or ‘X’, the next photo appears automatically. This single feature is a huge speed booster.
Comparing the Best of the Best
For those moments where the AI has grouped several great shots together (like during the wedding vows or the first dance), use Lightroom’s Survey Mode. Select the 3-4 top contenders, press the ‘N’ key, and see them side-by-side. This makes it instantly obvious which photo has the perfect expression, the best composition, and the sharpest focus. Pick your winner, flag it, and move on.
Step 4: Use Keyboard Shortcuts and External Controllers
Every time your hand leaves the keyboard to grab the mouse, you lose rhythm and, more importantly, you lose time. Seconds add up to minutes, and minutes add up to hours over the course of a year. Mastering your tools means becoming fluent in their language, and for culling, that language is keyboard shortcuts and tactile controls.
Remember, photographers only deliver about 10-15% of the photos they take. That means you’re actively rejecting up to 90% of your work. The faster you can make those ‘reject’ decisions, the more profitable your business becomes.
Essential Hotkeys for Culling in 2026
Your left hand should live on the keyboard. Program these into your muscle memory.
- `P`: Flag as Pick. Your ‘yes’ button.
- `X`: Mark as Reject. Your ‘no’ button.
- `U`: Unflag. Your ‘undo’ button.
- `Caps Lock`: Toggles Auto-Advance on/off in most applications. This is a must.
- `G`: Go to Grid view. Useful for seeing the big picture.
- `E` or `Spacebar`: Go to Loupe (full-screen) view.
- `N`: Survey view for comparing selected photos.
- `1-5`: Star ratings. Use these after the initial P/X cull to rank your keepers.
Level Up with Physical Controllers
For the ultimate in speed and ergonomic comfort, consider a dedicated hardware controller. Tools like a Loupedeck, TourBox, or even a programmable Stream Deck allow you to map culling functions to physical buttons, dials, and knobs. Why is this faster?
- Tactile Feedback - You don’t have to look down at your keyboard. You can feel the button for ‘Pick’ and the dial for ‘Zoom’. Your eyes stay on the photos.
- Simultaneous Actions - You can rate a photo with one finger while zooming in with a dial using another. It allows for more complex, fluid actions than a keyboard and mouse alone.
- Reduced Strain - It’s more ergonomic over long culling sessions, reducing the risk of repetitive strain injury (RSI). You can map your most-used functions to the most comfortable buttons.
This isn’t just about being fancy. It’s about turning the culling process into a physical, intuitive extension of your creative intent, removing another layer of cognitive load from the task.
Step 5: Final Review and Syncing to Editing
You’ve done it. The AI handled the technical rejects, and you’ve flown through the remaining shots, picking the emotional winners. The final step is to formalize these decisions and smoothly transition into the editing phase. This is where your new, efficient workflow really connects, moving from culling to creative work without missing a beat.
Syncing AI Ratings to Your Catalog
If you used a tool like Imagen, the culling data (your picks, rejects, and ratings) exists on their platform. The next step is to bring that information back into your home base, your Lightroom Classic catalog. This is typically a one-click process. You’ll download the updated metadata, and Imagen will apply the flags and ratings directly to the photos in your catalog. Suddenly, your local library mirrors the decisions you made in the AI environment. You can now create a smart collection or filter to see only your “Picked” photos, and you’re ready to start editing. You can also keep going inside Imagen, since culling and editing now share one project.
The “Final 10%” Sanity Check
Before you hit ‘delete’ on all the rejected photos, perform one last, super-fast check. It’s a crucial step for building trust in your AI-assisted workflow. Here’s how:
- Filter your catalog to show only the photos marked as ‘Rejected’.
- Switch to Grid view (`G` key) and make the thumbnails fairly small, so you can see many at once.
- Quickly scroll through the entire set of rejects. You aren’t looking at each photo individually. You’re scanning for anything that jumps out at you-a moment of unexpected laughter, a unique composition, an abstract shot that the AI might have flagged for being out of focus but which you see as artistic.
This entire process shouldn’t take more than five minutes. 99% of the time, you won’t find anything worth saving. But that 1% of the time you rescue a hidden gem, you reinforce your role as the creative director of the process. You’ve the final say, not the algorithm. Once this check is done, you can confidently delete the rejected files and free up your hard drive space.
Solving Common Culling Hurdles
Even with the best workflow, you can hit snags. Software can lag, AI can make questionable choices, and you might wonder if the investment is truly worth it. Here’s a quick reference table to address the most common issues photographers face during the culling process.
| Problem | Likely Cause | Solution |
|---|---|---|
| My software is lagging and unresponsive. | Culling from a slow external drive, not using Smart Previews, having a full system cache, or SSD thermal throttling during long sessions. | Work exclusively from an internal NVMe SSD. Always generate Smart Previews on import. Regularly optimize your catalog and clear caches. Ensure your computer has adequate cooling. |
| The AI rejected a photo I would have kept. | AI settings might be too strict, or the photo has subjective value (e.g., emotional moment despite a technical flaw like soft focus). | Adjust the AI’s sensitivity or strictness settings for future culls. Always perform the “Final 10% Sanity Check” (as described above) to catch these subjective gems. |
| The AI grouped photos I don’t think are duplicates. | The similarity threshold in the AI might be set too broadly, grouping photos from the same general moment together. | Most AI culling tools allow you to adjust the “grouping sensitivity.” Tighten this setting so it only groups near-identical burst shots. |
| Is the cost of AI culling really worth it? | Manual culling feels “free” because you’re not paying a per-photo fee, but you’re paying with your time. | Calculate your effective hourly rate. If manual culling takes you 4 hours, and your time is worth $75/hour, you’ve spent $300 on that task. With Imagen, pay-as-you-go photographers pay on export, so you can weigh that cost against the hours you get back. |
| My computer is too slow to run AI tools locally. | Local AI processing can be resource-intensive, requiring a powerful CPU and ample RAM. | Use a cloud-based culling solution like Imagen. You upload your photos, their powerful servers do all the heavy lifting, and you just download the results. This makes AI accessible even on older hardware. |
What’s new in Imagen: Imagen is now an intelligent, agentic Studio for professional photographers, so a faster cull flows straight into the rest of the job. You cull, edit, review and export in one project, in any order. AI filters such as blur and closed eyes help you narrow a shoot, or you can cull manually for free. Ask the assistant to find photos in plain language, and you stay in charge of every pick. The Studio is rolling out gradually as a beta.
Frequently Asked Questions
Can I trust AI with a once-in-a-lifetime event like a wedding?
Yes, because you’re using it as a powerful assistant, not the final decision-maker. The best practice is to let the AI handle the 80% of obvious rejects due to technical flaws, then you perform a quick manual review to make the final creative and emotional selections.
How does AI culling handle subjective or artistic photos?
AI is primarily focused on objective technical metrics like focus, eye closure, and composition. For subjective photos (e.g., intentional motion blur), you may need to “rescue” them during your final manual review. Its main job is to remove the clear junk so you can focus on the art.
What’s the difference between AI culling and AI editing?
AI Culling is the selection process; it helps you choose the best photos from a large set. AI photo editing is the post-processing step; it applies edits like color correction and exposure adjustments to your selected photos, often based on your personal style by using AI profiles.
How does Imagen pricing work for culling?
With pay-as-you-go, you pay on export for the photos you deliver. Manual culling is free too, so it is easy to try the new Studio on a real shoot. You can find the latest details on the Imagen pricing page.
Will AI culling work with my Capture One workflow?
It depends on the specific tool. While many AI tools were initially built for Lightroom, platforms like Imagen are expanding their compatibility. Always check the tool’s official integrations list, but workflows often involve exporting photos, culling them, and then re-importing the selections.
How much time can I realistically expect to save?
Most professional photographers report saving 70-90% of their culling time. A task that used to take 3-5 hours can often be completed in 30-45 minutes, with the majority of that time being a final, creative review.
Is cloud-based or local culling faster?
The processing itself is faster on powerful cloud servers. The main variable is your internet upload speed. If you’ve a slow connection, the upload time might negate the processing speed advantage. However, for most users with decent broadband, the cloud workflow is significantly faster overall.
Can I customize the AI’s culling preferences?
Yes. Most modern AI culling apps, including Imagen, allow you to adjust the “strictness” or “sensitivity” of the algorithm. You can tell it to be more or less aggressive in flagging issues like soft focus, which helps you tailor the results to your personal quality standards.